
17 Nov Brand Guidelines
Jump to:
The images you upload to iBe are more important than they may seem at first.
Your location’s image, banner and location page is the first thing people will find when searching for location, so it needs to be eye-catching and recognisable.
From there, your product images need to be well-presented, and fit within the bounds of how they appear. For instance, sticky toffee pudding might be your house speciality, but if the image attached to the product looks like it was taken on an 8-year old photo in a cave, people aren’t going to order it!
When you sign up to iBe, our “wizards” will take your branding and create something within our guidelines. This is usually a good starting point for if you wanted to change your imagery further down the line!
Your Location Banners (or “Cover Photo”)
These are uploaded from your device in the iBe Dashboard under Locations > Edit Profile > Cover Photo.
Your location banners are seen when iBe users are scrolling through the ‘Find/Order’ tab on the app. This image is key to drive people to have a look at your venue and place an order. Below is an example of how the cover photo looks when uploaded to the iBe Dashboard.
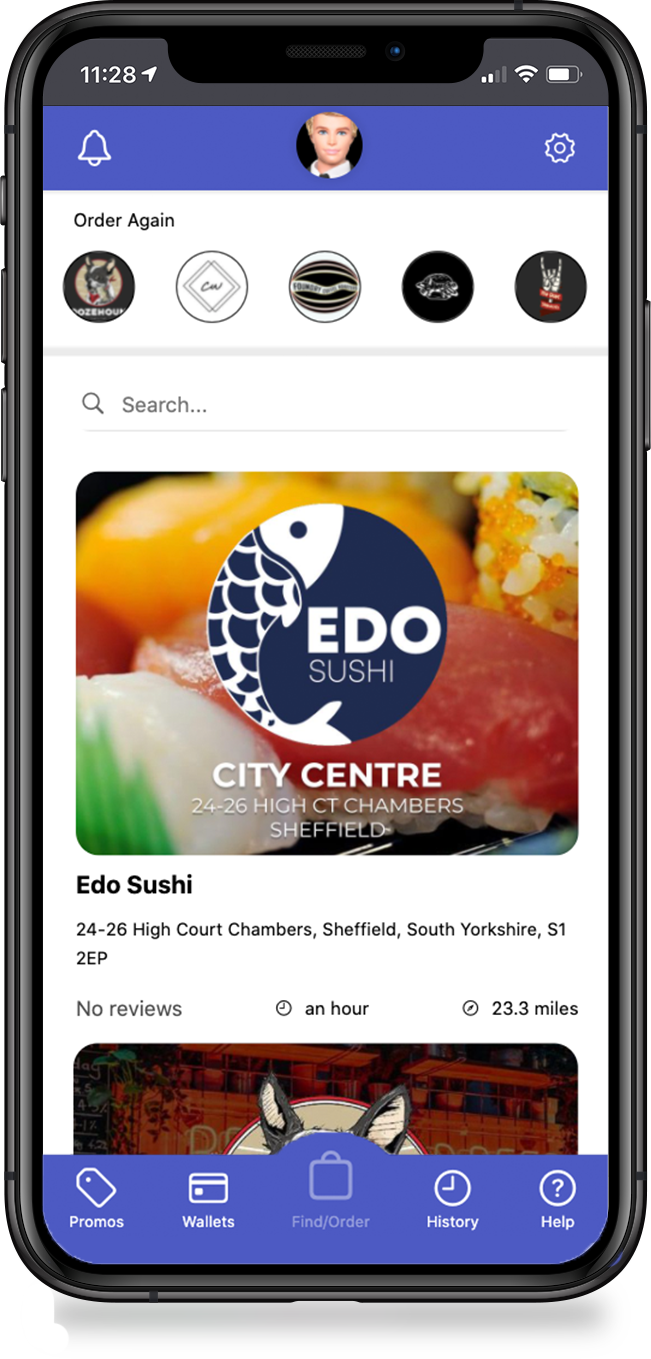
Image uploaded here was 1200×920 pixels
The images shown above are a good example of branding, and showcase a good few elements that are desirable when creating your banner. A few pointers are listed below as good places to start when designing a location banner. Not all of these guidelines have to appear in the same design, but pick, choose and combine these wisely to create a great banner:
- The logo is present (this builds brand recognition, in case people want to come back to find you)
- The logo is large and contrasts against the background
- The background is a solid colour or a gentle gradient with the logo on top in contrasting colours
- The background keeps with the venue’s colour scheme
- The background is an image of the venue itself, or of the main product sold, slightly darkened/lightened to bring out the logo
- The colour scheme carries across the entire banner
If you wanted get REALLY creative, we’d love to see what you can come up with. We’ve seen some people experiment with having a seemingly transparent background using iBe background colour, being pure white, or #FFFFFF. We encourage people to think outside the box when it comes to their image banner. It’s like a virtual shopfront, so the more eye-catching, the better!
- Please note these images can be scaled up from the denoted resolution above. You can use a ratio calculator to figure out different sizes
- The upload sizes are limited at 2Mb
- If you upload a .png file with transparency, it will be converted into a .jpg image, and the transparent section will be turned black
- Therefore, we recommend uploading .jpg files in the first place, so you know exactly how the image will look.
Your Location Icon (or “Logo”)
These are uploaded from your device in the iBe Dashboard under Locations > Edit Profile > Logo.
Your logo is seen is quite a few places across the iBe app (examples shown below):
- In the Shared Wallet screen in the ‘Valid at:’ section
- Alongside customer receipts in their ‘Order History’ section
- On Promotion tiles next to your promotion title
- On posts/promotions when your locations are tagged
A logo on a customer receipt
![]()
A logo on a promotion tile
![]()
- Please note these images can be scaled up from the denoted resolution. You can use a ratio calculator to figure out different sizes
- The upload sizes are limited at 2Mb
- If you upload a .png file with transparency, it will be converted into a .jpg image, and the transparent section will be turned black
- Therefore, we recommend uploading .jpg files in the first place, so you know exactly how the image will look.
Your Product Images
Product images are uploaded directly to the Lightspeed POS system, and synced through to iBe.
Your product images are vital for getting people to actually buy your products. As explained above, sticky toffee pudding might be your house speciality, but if the image attached to the product looks like it was taken on an 8-year old photo in a cave, people aren’t going to order it!
Guidelines we generally suggest:
- Have a shoot organised with a professional
- Be consistent in presentation, if products are similar (e.g if you sell a lot of pizzas or books, take all images at the same angle to show variation)
- Use good lighting, so as to show your product how the customer would see it
- Dress your food/plates up to enhance their appearance
- However, don’t add things that make it look like the customer will receive the set dressing when they purchase the product
- For instance, don’t add additional garnish onto food, or don’t add similar products into the same shot
- Try to incorporate some brand colours or items, such and branded napkins to increase brand recognition
Below is a very good example of uploading a square image with enough space around it that when the customer clicks on the product, it zooms in and shows the product off even better than before. This is a great way to get people wanting your products even more!
Product image as a small icon
![]()
Product image as a larger banner when clicked
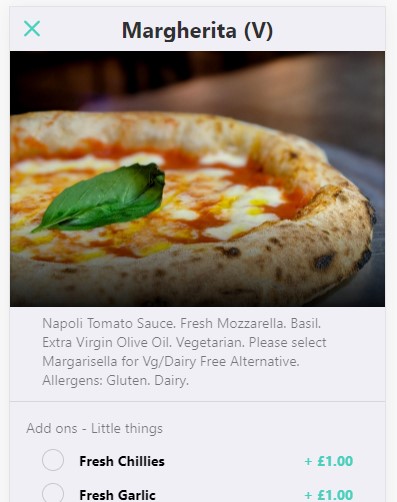
We recommend uploading pictures that will allow the visible area to have a resolution of 700×700 pixels. Product images are uploaded to Lightspeed and converted to squares upon uploading. You are able to drag and resize images within Lightspeed itself, so if you have an image you’re happy with, don’t worry too much about cropping it before uploading!
- If you upload a .png file with transparency, it will be converted into a .jpg image, and the transparent section will be turned black
- Therefore, we recommend uploading .jpg files in the first place, so you know exactly how the image will look.
Sorry, the comment form is closed at this time.