
01 Oct Changing Location Information
Jump to:
-
‘Edit Profile’ – Images, Address, Opening Times etc.
-
‘Settings’ – Order Methods, Delivery Thresholds
Business Profile vs. Location Profiles
The first issue most users come up with is the difference between the Company Profile and the profile of each individual Location (or ‘Site’ in POS systems like Lightspeed). In the image below, you can see that by clicking on ‘Locations’ along the left hand side, you’re able to access each of your location’s individual profiles.
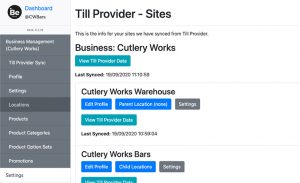
To change the information, such as opening times or location images, press ‘Edit Profile’ on the location you wish to edit.
‘Edit Profile’ Settings
Below are descriptions for each field found in the ‘edit profile’ page on each location. To save any of this information and apply it to your live app profile, you need to fill in the information and press ‘Update’ at the bottom of the page.
Contact URL:
Not currently in use (will hopefully be more useful later in development!)
Location URL:
Not currently in use (will hopefully be more useful later in development!)
Booking URL:
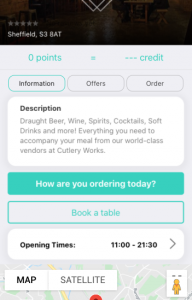
Enter here the link you’d like to take people to to book at your location. This can be links to official booking websites like Resdiary, OpenTable etc. or custom links to your own websites.
This booking link appears when people go on to your location page. (Pictured Below)
Opening Date:
Not currently in use (will hopefully be more useful later in development!)
Picture:
This is the image that appears as an icon next to:
- Promotions
- Wallet Listings
- Receipts (Pictured Below)
To upload an image, click on the box, and a file browser will appear for you to select an image from your device.
(Note: images are converted to .jpg files when uploaded, so any formats that contain transparency values will have the transparent components converted to solid black. This will not affect the opaque elements of the image)
(Note 2: Square images are best suited for the image section, and resolutions above 500×500 do not yield better results)
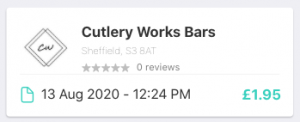
Uploading a picture to the ‘Picture’ field will appear on the app like this
Cover Photo:
This image is the image that will appear on your location page at the top, and as the main large image when people search on the ‘Find/Order’ tab.

To upload an image, click on the box, and a file browser will appear for you to select an image from your device.
Optimal sized images for this would be sized at 1200×920 pixels. Each device is different, however, and certain devices will crop your cover photo in different ways.
(Note: images are converted to .jpg files when uploaded, so any formats that contain transparency values will have the transparent components converted to solid black. This will not affect the opaque elements of the image)
Description:
The description you enter here will appear on your location page (as shown above in the 2nd picture).
There is no maximum amount you can enter here, but it would be advisable not to enter too much here, as the description would consume most of the page and obscure the buttons required to order or see your opening times.
Phone Number:
Entering your phone number correctly is VITAL for you to be able to accept orders for Delivery. Stuart, the delivery provider, requires a valid phone number to be entered to even schedule deliveries in the first place. If you find you’re having trouble with deliveries working, please come here first and check the phone number is correct.
iBe will have already entered ’44’ as the country code, so if you’re in the UK, leave this as it is.
For the phone number box below it, enter your full phone number without the 0 at the start that you would like passed on to Stuart delivery drivers, in case of any issues.
For instance if your phone number is ‘07415 068 548’, you’d enter this as ‘7415068548’.
Address:
Entering your address correctly is also VITAL for deliveries to work with your location. If the address doesn’t get recognised as valid by Stuart, the delivery provider, then no drivers can be scheduled to pick up from you.
In this case, you need to enter something in every single field apart from Address Line 2, which is optional. This means:
- Address Line 1 (Doesn’t accept ranges of number, e.g. 73-101 Neepsend Lane. Must choose either 73 OR 101 Neepsend Lane, for instance)
- Town (can mean City as well, e.g. Sheffield)
- County/State (e.g. South Yorkshire)
- Country (United Kingdom)
- Postcode
Must ALL be filled in 100% correctly.
Opening times:
To enable opening times to show on your location page, be sure to check the box that says ‘Enable Opening times?’. This is located just below the field for the Description listed above.
To then set your opening times for that location, check the box that says ‘Open’ to the right of each day you are open. Then, set the opening times for each day using the drop downs show below.

Update:
Once you’ve completed all the information you want to update, don’t forget to press ‘Update’ at the bottom of the page to apply your changes. If anything is incorrect with any of the information you’ve entered, the page will let you know so that you can correct the information.
‘Settings’ Menu
Below are descriptions for each field found in the settings page on each location. To save any of this information and apply it to your live app profile, you need to fill in the information and press ‘Update’ at the bottom of the page.
Enable Location?
This is a toggle switch for turning the location on and off. Unticking this box will remove your location from being found on the app. It will also prevent any orders in progress completing. Use this option if you are closing a location down, not using the location on the app, or if you’re simply overwhelmed with orders!
Category
This is the category you appear in on the Find/Order tab. This will have been allocated to you when you signed up for iBe, so please don’t change this without letting the iBe team know.
Lat/Lon
These fields are automatically generated when you enter your address into either the Lightspeed POS system, or when you update your address in the ‘Edit Profile’ section (mentioned above)
Enable Pay at Till / Order at Table / Delivery / Click & Collect
Use these checkboxes for enabling and disabling certain order methods from being selected when ordering with that location. Uncheck the box if you don’t want that option selectable for the customers.
Lead Time
This is the time on average it takes you to prepare an order for either Delivery and Click & Collect. We’d recommend taking your actual average time, and then adding 5/10 minutes to account for busier periods. This usually ends up in an ‘Underpromise – Overdeliver’ situation, with orders being ready far sooner than expected.
- For Delivery: The times offered to the customer are calculated by your lead time + 15mins (for the drivers). For instance if your lead time is 25mins, the customer’s earliest possible delivery time will be 40mins from the time they place the order.
- For Click & Collect: The times offered to the customer are calculated by your lead time alone. For instance, if your lead time is 25 mins, the customer’s earliest possible delivery time will be 25mins from the time they place the order.
Delivery Discount Mode
This mode is how you wish to split delivery costs between you and your customers. The configuration for each of these methods is listed below this box on the page.
- None: The entire cost of delivery falls to the customer
- Fixed: A set discount off delivery charges is applied to the customer.
- Percentage: A percentage of the delivery charges is applied to the customer.
Delivery Charge %
This box only applies if you have selected ‘Percentage’ in the ‘Delivery Discount Mode’ dropdown selector.
This is the percentage of the delivery charges the customer will pay. The remaining percentage amount will then be paid by yourself on each delivery. For instance if a delivery costs £5 and this is set to 60%, the customer will pay £3 for delivery, and you will pay £2 (the remaining 40%).
Delivery Charge Fixed Discount
This box only applies if you have selected ‘Fixed’ in the ‘Delivery Discount Mode’ dropdown selector.
The amount entered here is in pence. For instance to enter £2, you will need to enter 200.
This is an amount that is deducted from the total delivery charge the customer pays. A good way to think of it is this is the amount that will be paid by yourself on each delivery. For instance if a delivery costs £5 and this is set to £2, the customer will pay £3 for delivery, and you will pay £2.
Free Delivery Threshold
The amount entered here is in pence. For instance to enter £50, you will need to enter 5000.
This setting is completely optional, but allows you to set an amount over which the customer receives free delivery, and you will pay the entire delivery charge. For instance, if this is set to £50, the customer will only pay for the items they ordered when the order total exceeds £50. This amount is calculated before loyalty points are deducted.
Minimum Delivery Threshold
The amount entered here is in pence. For instance to enter £10, you will need to enter 1000.
The amount entered here is the minimum amount the order total can be before ordering for delivery is an option presented to the customer. For instance if your minimum threshold is set to £10 and the customer only has £9 worth of items in their basket, the Delivery option will be greyed out, and they’ll be presented with a message stating that they need to order £10 or more to get their order delivered.
Maximum Delivery Cost Allowed
The amount entered here is in pence. For instance to enter £10, you will need to enter 1000.
The amount entered here is the maximum possible cost you allow deliveries to be before any fixed/percentage discounts entered above are applied. For instance if this is set to £9, and someone’s delivery charge is calculated at £10 total inc. tax, an error message will be shown to the customer stating that delivery is not available in their area.
Update:
Once you’ve completed all the information you want to update, don’t forget to press ‘Update’ at the bottom of the page to apply your changes. If anything is incorrect with any of the information you’ve entered, the page will let you know so that you can correct the information.
Sorry, the comment form is closed at this time.