
01 Oct Creating & Configuring Promotions
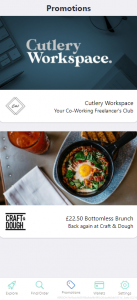
Promotions are small advert-style tiles that appear on your location pages in the ‘Offers’ tab, and the main ‘Promotions’ tab along the bottom of the iBe app. Customers see these promotions in the Promotions tab when they’re nearby your location amongst other nearby location’s promotions, and they’re listed in date order, so the most recent promotions listed will appear first in the list.
Jump to:
When a customer clicks on a promotion, they can read all about it, see linked locations, and most importantly, save it to the wallet your location is listed in. Saving promotions to wallets makes the promotion appear in that person’s wallet, so the next time the customer looks at the wallet, your promotion will be listed there to remind them of what you’ve got going on.
(Note: Promotions are currently purely for advertising purposes, and are not able to affect product pricing or applied offers on iBe. This will have to be applied on your POS system to coincide with the promotion appearing.)
Promotions are recommended to be used for:
- Letting customers know of new offers/deals
- Announcing major business changes
- Announcing side projects
- Information on sister locations / partnered businesses
There is currently no limit to how many promotions you can have running at any one time, but using them sparingly will be far more effective in the long run.
Adding Promotions
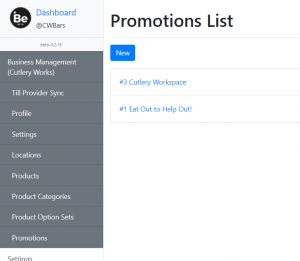
To get started adding a promotion, go to the ‘Promotions’ tab on the left menu on the iBe Dashboard, and click ‘New’ in the top left of the page (pictured below).
Upon pressing ‘New’ on the promotions tab, you are then able to fill out all the details of your promotion. Listed below are the fields you are able to fill out, each with information about what that field does. After completing your promotion’s details, remember to press ‘Save’ at the bottom of the page to save the promotion.
Owner:
(Note: This field only appears if you have multiple active locations on the iBe Dashboard)
This dropdown shows any business you manage, which is set when you are set up with iBe by our administrators. The business selected here is the one that will show up on the promotion tile. Any locations under the business linked to the promotion (selected later down the page) are shown once the user clicks through to the promotion.
Title:
This is the title of the promotion that is visible to the user, and used to find your promotion later on in the Promotions tab on the iBe Dashboard.
Subtitle:
This is the subtitle that only appears underneath your promotion title on the promotion tile. Use this field to give a brief tagline for your promotion to grab attention.
Start Date:
This is the date and time you wish your promotion to be visible from. As mentioned above, the promotion is not able to affect any pricing or discounts on iBe. These will need to be applied on your POS system to function properly. This start date field only controls when the promotion tile will become visible.
End Date:
This is the date the promotion will stop being visible to customers, and any customers with the promotion saved in their wallets will no longer be able to see the promotion tile in the wallet after this date and time.
Availability:
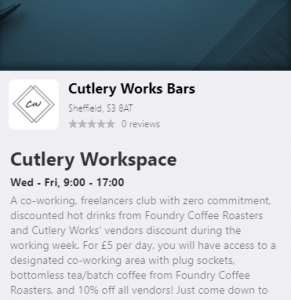
This is used a kind of second subtitle field, and only appears underneath the promotion title when the customer clicks through to the promotion (shown below). Use this to show when a product is available, or use it as a second tagline, if the promotion is not time-based.
Hero URL:
Not currently in use (will hopefully be more useful later in development!)
Category:
This dropdown menu allows you to select which wallet you want the promotion to appear in when saved. It is advisable that you select the same wallet that the related location is listed in.
Hero Image:
This is the main image used on the promotion tile, and as the cover photo when the promotion is selected in the app. The ideal image size for this is 1125×600 pixels. The image is slightly cropped when the main page of the promotion is opened, ensure that any content you want visible when the promotion is clicked on is visible in the central 815×600 pixels.
To upload an image, click on the box, and a file browser will appear for you to select an image from your device.
(Note: images are converted to .jpg files when uploaded, so any formats that contain transparency values will have the transparent components converted to solid black. This will not affect the opaque elements of the image)
Description:
This is the main body of the promotion. This appears when a promotion is clicked on, and gives the bulk of the information about the promotion. There is no limit to the length of this section, but it is recommended to keep the information concise.
Locations:
This dropdown is populated with any location pulled through when doing a ‘Till Provider Sync’. Select locations from here to append links to their respective location pages in the promotion. Every location selected will show the promotion listed on the respective location page under the ‘Offers’ tab.
When multiple locations are selected, the ‘Owner’, defined above, is shown as the business the promotion relates to, and the associated locations are shown as a “+ More Locations” link underneath the business name.
‘Publish?’ Checkbox:
If you wish to publish your promotion immediately, check this box. If you wish to save the promotion for later editing and publishing, but don’t wish to publish it straight away, leave this box unchecked, and then press the ‘Save’ button below the checkbox. Promotions can be returned to from the relevant ‘Promotions’ tab on the left menu.
Save:
Please ensure you save the promotion after you have finished filling in all required information. If any required information is missing, and you press save, the page will return you to the relevant box, and prompt to fill in that information.
Sorry, the comment form is closed at this time.